Hello,
I'm going to be off line for a little bit. I'm moving this week then heading out of the U.S. for a couple months. I'm starting a job at Avalanche Studios, doing VFX. To say I'm excited is a bit of an understatement. After I get back I'm going to start a series of VFX called Magic Show. I don't get to do a lot of magic type effects, so I wanted to stretch my legs a bit with this project. I'm working up the concepts now, and convincing some of my animator friends to help with the character animations. I'll be posting more about that in the new year. Thanks for coming by and until next time. Have a good holiday!
Fred

Thursday, September 22, 2011
Tuesday, September 6, 2011
Basic FX Materials in Unreal
VFX Materials
The Material system in Unreal is an amazing tool, since it has so many options and ways to achieve the same result. VFX rely on slick looking materials to achieve their visual target. Today, I'm going to go over the basic materials I use for sprites in Cascade.These are the three work horse materials: Additive, Traslucent and Modulate materials. This post will not be going over lit (sprite) or model materials for cascade as I'll be doing that in a later post. You should have a basic understanding of Unreal's material system.
Material links to the UDN
FX Artist Home
UDN Materials Tutorals
UDN Materials Compendium
Depth Bias Alpha
Definitions and uses:
Additive Materials: Fire, motes, energy, glowy bits: Additive materials add the sprite against the scene, similar to a Screen blend in Photoshop.
Translucent Materials: For smokes, and faked debris bits: Translucent materials use the source color of the sprite and adds opacity (alpha) to it, then blends it against the scene color.
Modulate Materials: Dark smoke, decals, and some smaller debris: Modulative materials multiply the sprite against the scene, similar to the multiply blend mode in Photoshop.
Before we start
Import textures into unreal that you can use for this test. Make sure all textures are targa and are power of 2.
Additive texture: Black is knocked out, so anything black will not display in an additive blend mode. Remember to make sure the texture uses the space well since the sprite will still need to calculate the unseen areas. This can have an alpha texture but is not necessary for this case.
Translucent texture: This can be any kind of texture, with an alpha channel that will serve as the knock out. For example if you wanted to have a leaf texture. the RGB would support the color and the alpha would serve as the transparency.
Modulate texture: This is the polar opposite of the Additive. White is knocked out and colors are multiplied against the scene. This can have an alpha texture.

Additive Material Base
The basic material will be set up in the emissive, and to get anything in game you'll need very little. The following material will have static switch set ups for UV distortion and near fade and a control for depth bias alpha. This will look like this when we're done.
 I'll be breaking down each commented section while we go.
First, In Material make sure the blend mode is set to Additive and the Lighting Model is unlit. In Usage make sure the Used with Particle Sprites and Used with Particle SubUV is checked, otherwise the sprite will not display when you get it to Cascade.

Next drop a Param2d (name it Emissive), a Vertex color and a multiply module near the Emissive hook up. String the modules up like this
This set up will allow you to change the color of the RGB values of the texture in Cascade dynamically. I use this for 99.9% of all FX materials that I use unless I know for sure the color of this will never be changed. At this point you can start working with the sprite in Cascade. This is really all you need. I usually add a couple other properties to the material, since I tend to need them in most particle systems. (Note: Make sure you string this into the Emissive, if you hook it into the diffuse it will appear solid black).
Save your material and package.
Distorting the UVs
Sometimes you'll want to distort the UVs of the texture for fire or to give the surface some extra motion. Set up the following like this and string it into the UV hook of the Param2d Emissive module.

The Switch parameter is set up in case we want to use the distortion. The A channel is the UV Distort option while the B channel is no distortion and is the default in this case. The switch parameter is an if/then statement and will show up in INST materials.
DepthBiasAlpha
One of the functions of Depth Bias Alpha is to remove hard lines of sprites crashing into geometry. The set up is really simple. All you'd need to do is set up the DepthBiasAlpha module and string it into opacity. The lower the number in the depth bias the less smooth the blend and also the larger the blend. Experiment with this until you get a result you like (defaults to 250). The UDN has more info on this magic module here.

Near Screen fade.
This next set fades sprites based on its camera position. This keeps sprites from crashing into the camera. Set up the following and hook it into the DepthBiasAlpha Alpha entry:

That's the additive base in a nutshell. All the other materials are similar to this so I'll be working on the exceptions from here on out.
Translucent Material Base
This is the easiest to change since the base of the additive is most of the work. There are a couple things you'll need to add and change.
First make sure you make a copy, rename the material and change the blend mode to Translucent

Next Add in 2 multiply modules, a Vertex color and a constant clamp and set it up like the following:


Modulate Material Base
This one will be a little different. The base is still the Additive material, but we're going to need to treat this as everything is blending to white instead of black, since this multiplies its values against the scene. (Note: as of this post I was getting an error with the modulate blend mode against the DepthBiasAlpha node, so it will be absent from the material. I'm looking onto it and will hopefully have an update to it soon)
First thing you'll need to do is change the blend mode to modulate

Next you'll need to re-string a couple entries to make the modulate blend mode work. Change the texture to the modulate texture and add in a Lerp(linearinterp), a constant, an add a constant clamp module. Set it up like this:

This is what this is set up to do. Again we're blending to white, since its a modulate texture
The way the near fade is set up now is to blend to black, so we're going to need to change that. Drop a oneminus near the fade and set it up like this:

Fred
The Material system in Unreal is an amazing tool, since it has so many options and ways to achieve the same result. VFX rely on slick looking materials to achieve their visual target. Today, I'm going to go over the basic materials I use for sprites in Cascade.These are the three work horse materials: Additive, Traslucent and Modulate materials. This post will not be going over lit (sprite) or model materials for cascade as I'll be doing that in a later post. You should have a basic understanding of Unreal's material system.
Material links to the UDN
FX Artist Home
UDN Materials Tutorals
UDN Materials Compendium
Depth Bias Alpha
Definitions and uses:
Additive Materials: Fire, motes, energy, glowy bits: Additive materials add the sprite against the scene, similar to a Screen blend in Photoshop.
Translucent Materials: For smokes, and faked debris bits: Translucent materials use the source color of the sprite and adds opacity (alpha) to it, then blends it against the scene color.
Modulate Materials: Dark smoke, decals, and some smaller debris: Modulative materials multiply the sprite against the scene, similar to the multiply blend mode in Photoshop.
Before we start
Import textures into unreal that you can use for this test. Make sure all textures are targa and are power of 2.
Additive texture: Black is knocked out, so anything black will not display in an additive blend mode. Remember to make sure the texture uses the space well since the sprite will still need to calculate the unseen areas. This can have an alpha texture but is not necessary for this case.
Translucent texture: This can be any kind of texture, with an alpha channel that will serve as the knock out. For example if you wanted to have a leaf texture. the RGB would support the color and the alpha would serve as the transparency.
Modulate texture: This is the polar opposite of the Additive. White is knocked out and colors are multiplied against the scene. This can have an alpha texture.
Additive Material Base
The basic material will be set up in the emissive, and to get anything in game you'll need very little. The following material will have static switch set ups for UV distortion and near fade and a control for depth bias alpha. This will look like this when we're done.

First, In Material make sure the blend mode is set to Additive and the Lighting Model is unlit. In Usage make sure the Used with Particle Sprites and Used with Particle SubUV is checked, otherwise the sprite will not display when you get it to Cascade.

Next drop a Param2d (name it Emissive), a Vertex color and a multiply module near the Emissive hook up. String the modules up like this
 | |
| Vertex color mult by the texture equals Dynamic color changes in Cascade |
Save your material and package.
Distorting the UVs
Sometimes you'll want to distort the UVs of the texture for fire or to give the surface some extra motion. Set up the following like this and string it into the UV hook of the Param2d Emissive module.

- The Panner moves your texture in the U and V space as well as controls time.
- This is hooked into the UV in of the Param2d UVDisort Texture. The green channel is multiplied against a parameter to control the intensity of the distort and is added to a texture coordinate module (I used the green channel since it had the most contrast).
- This creates a surface that can be distorted against the Emissive texture.
The Switch parameter is set up in case we want to use the distortion. The A channel is the UV Distort option while the B channel is no distortion and is the default in this case. The switch parameter is an if/then statement and will show up in INST materials.
DepthBiasAlpha
One of the functions of Depth Bias Alpha is to remove hard lines of sprites crashing into geometry. The set up is really simple. All you'd need to do is set up the DepthBiasAlpha module and string it into opacity. The lower the number in the depth bias the less smooth the blend and also the larger the blend. Experiment with this until you get a result you like (defaults to 250). The UDN has more info on this magic module here.

Near Screen fade.
This next set fades sprites based on its camera position. This keeps sprites from crashing into the camera. Set up the following and hook it into the DepthBiasAlpha Alpha entry:

- This takes the screen position and masks the Z position, since most sprites are camera facing on the Z axis, then multiplies a distance from the position and clamps it 0-1 to avoid some visual artifacts.
- This is then hooked into a switch parameter in case we want to use this functionality.
That's the additive base in a nutshell. All the other materials are similar to this so I'll be working on the exceptions from here on out.
Translucent Material Base
This is the easiest to change since the base of the additive is most of the work. There are a couple things you'll need to add and change.
First make sure you make a copy, rename the material and change the blend mode to Translucent
Next Add in 2 multiply modules, a Vertex color and a constant clamp and set it up like the following:
- Hook the alpha (white connector) if the Param2d Emissive to one of the multiply nodes A and connect the DepthBiasAlpha to B.
- To make the alpha dynamic in Cascade hook the Vertex color module and the other multiply. Then set up the constant clamp from 0-1 (default) and hook it up to the opacity node.
- This will keep the alpha multiplies within a 0-1 range.
Modulate Material Base
This one will be a little different. The base is still the Additive material, but we're going to need to treat this as everything is blending to white instead of black, since this multiplies its values against the scene. (Note: as of this post I was getting an error with the modulate blend mode against the DepthBiasAlpha node, so it will be absent from the material. I'm looking onto it and will hopefully have an update to it soon)
First thing you'll need to do is change the blend mode to modulate

Next you'll need to re-string a couple entries to make the modulate blend mode work. Change the texture to the modulate texture and add in a Lerp(linearinterp), a constant, an add a constant clamp module. Set it up like this:

This is what this is set up to do. Again we're blending to white, since its a modulate texture
- The Lerp is using the vertex color (alpha) to blend the texture from its surface to 1 (white)
- The vertex color is also set up to control the color of the texture (black node to mult B)
- The alpha of the modulate texture is masking the edging of the surface so if you change the color in Cascade it only covers the circle (in this case)
- The Add module combines the mask and the lerp controls
- the Constant clamp keeps it within a 0-1 range
The way the near fade is set up now is to blend to black, so we're going to need to change that. Drop a oneminus near the fade and set it up like this:

- Place the one minus module between the multiply and the constant clamp to switch the black to white.
- Then change the constant from 1 to 0 out of the Switch parameter, otherwise the base material will appear as black
- String switch parameter into the add and then hook the whole thing into the Emissive.
Fred
Thursday, September 1, 2011
FX Optimization and where have I been
This post is about FX optimization... the good thing is, I'm not going to write it. Tim Elek over at Epic posted a great Wiki on particle system optimization with an easy to use link system based on potential problems and whatnot. If you work on particle systems and manage overdraw at all in Unreal this is an essential read.
UDN FX Home
Direct link to UDN FX Optimization
Tim's blog is here, it has some good insight on Epic and everything FX and Tim!
http://derelict-compendium.blogspot.com/
So where have I been?
The reason I haven't been around a lot is I'd been let go in the lay offs at Kaos, and I'd been looking for work for the last couple months. I will be working for Avalanche Studios starting in October. I'll be out of the country learning their tech and helping out until December, so I'm going to post a couple things before I go.Also I have plans for a series that will cover a number of non realistic fx from concept to completion. I will tentatively be calling it Magic show. The plan (for now) is to pick an element and build a set of meshes, materials and particles from each type. I have a concept for Ice and fire, but after that building from the ground up and work it step by step in Unreal.
The next post will be more or less a basic materials set up for particle system types. This will not cover some of the more recent additions to Unreal's Cascade, but it will have the base that is necessary.
Until next time.
Monday, June 20, 2011
FX Reels
FX Reel 2010 Contact fhoop@rocketmail.com
Fred Hooper FX Reel 2010 from Fred Hooper on Vimeo.
Shot breakdown for 2010 reel

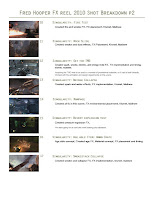
Homefront Reel
Homefront FX Reel 2011 from Fred Hooper on Vimeo.
Fred Hooper FX Reel 2010 from Fred Hooper on Vimeo.
Shot breakdown for 2010 reel


Homefront Reel
Homefront FX Reel 2011 from Fred Hooper on Vimeo.
Tuesday, April 26, 2011
Simualtion Render into Unreal Cascade as a SubUV Material
In this post I'm going to be going over how to get a simulation (in this case, a maya fire simulation) into Unreal's Cascade as a SubImage texture.
I'm assuming you have an interest with Unreal and Maya otherwise you wouldn't be reading this, so you should have a basic understanding of Unreal Cascade and material system, Photoshop and Maya's rendering pipeline. What I'm not going over is how the Maya simulation was made step by step. I could have multiple posts just for that, so I'm going straight to the render, assembly, simple additive material, and the simple cascade set up. So that said, here we go.
The Experiment:
How do you take a simulation from Maya, and use it in Unreal's cascade as a SubUV.
Fire render Maya fluids from Fred Hooper on Vimeo.
Simulation in third party package: First you'll need to make the simulation of whatever you want the effect to do. (in this case a fire test made Maya's fluid dynamics)
Need: Second, determine how long of a simulation you need. A lot of this depends on your budget and what kind of visual fidelity you're going for. Games usually shoot for 30fps (frames per second) or above so if you want to have the simulation run for a second you should have at least 30 good frames (I'll render 36 or 64 depending on my budget). Eventually this will need to be made into a texture, so if you're using a 1024 x 1024 with 36 frames, each frame will be 179.67px x 179.67px and get me a second+ of animation. All of this comes down to your texture budget, and reuse. If I'm loading a 1024 simulation I need to be using it a lot. You'll need to experiment a lot on this, since it comes down to give and take with the look vs the need.

Render: Next render the simulation as frames into a folder. I usually use targa (.tga)s since they don't have visual degradation. Depending on how long of a simulation and how many frames you want you may want to over render the simulation frames to have a larger sample size. So for a 36 frame texture I'll render 72+ frames and use every other frame for more motion between frames.

Assembly: Now you need to assemble the texture. Take the frames and assemble it chronologically in Photoshop. Generally its better to assemble the frames then drop it down to a power of 2 size. If you have a large enough sample size, you can skip every other frame if you think it visually will make sense. The sample that we're using here is every other frame, since it didn't seem to degrade the quality of the animation. If you can make a java script or an action to make assembling the texture faster, then please do. Otherwise you're going to have to do it by hand, which is slow and makes iteration more difficult. We're lucky in this case since this sim doesn't need an alpha component otherwise you'd need to assemble it twice.
Save this as a Targa and make sure the image is set as a power of two. (in this case 1024 x 1024)
After the assembly is complete, we have something that looks like this.

Into Unreal
Now we have the texture we need. We'll need to import it into unreal and make a material for it. Load up Unreal and go to the content browser.
Import: Import the texture and make a .upk called FXPyro, with a group texture and name the texture T_FireSubUV. Remember to save your package after every step.

Add the Material: Next make a new material in the FXPyro.upk, Group Materials called M_FXAddSubUV. We're going to make this an additive material for the T_fireSuvUV

Additive Material: Next we're going to work on the additive material. The Material system in Unreal is really powerful and again this post would be huge if I went into all of the little things it can do. In this case, we're going to need for it to be additive, be usable on particles, be usable as a SubUV, and for my personal satisfaction have an edge blend so the sprite doesn't crash with the environment. In the SubUV Texture node hook the T_FireSubUV to it. Right Click in the FXPyro pkg and select new material and save it as group 'Materials' Name M_FXAddSubUV. String up the material like this:
This material will allow us to use it in Unreal, and in this case Cascade.
Add a Particle system (Cascade): Now we're at the point where we can make a particle system in Cascade. Create a new Particle system in the package FXPyro with the subgroup FXFire and name it FX_FireSubUVTest.

Cascade ed will come up and make a new particle system by RCL (right click) on the window and select new particle system. Here you will have the basics of the system, but you'll need to add a couple modules to the initial system to make it work.

Have the Particle use the Material: We need to make the particle system use the fire material (and therefore texture) we've been working on. In the FXPyro package single right click to highlight M_FXAddSubUV. Switch over to the open cascade window and go to the required module and highlight the materials field (left arrow) the material name in it. The path of M_FXAddSubUV should be in there and the sprite may vanish. Do not panic... the reason it could have vanished is we're using a vertex color in the material, and cascade doesn't have color values it can use to make a color. If its not there, add a color over life module and make sure its set to Constant 1, 1, 1 and the fire material will appear. As you can see the sprite looks a grid and won't be very usable.

Next change the following nodes so we can see what we're doing.

SubUV Time: Now we have the material in Cascade, next we need to divide it into single frames. This takes a couple steps.

This set up will smoothly ransition between the frames if the following is set up correctly in required. In Required/subuv set the horizontal to 6 and the veritcal to 6. Now the simulation should spawn with the first frame.
To make it run through the animation change the Interpolation Method from none to PSUVIM_Linear_Blend and the simulation should start to run through the simulation, but it will snap between the beginning and end, since it hasn't been set up as a looping effect.
From here its a matter of tweaking the simulation to do what you want it to do in Cascade. This does not loop, to make it blend well you'd need to spawn multiple sprites and blend them in and out accordingly to make sure it doesn't snap... or import the render into aftereffects and make it loop before importing it into Unreal. For purposes of this example I changed the color over life to blend with a constant curve from 0 to 1 at the middle of the simulation and back to 0, with a spawn of 2.
Fire Test Unreal from Fred Hooper on Vimeo.
There are other uses for SubUVs rather than just running animations. If you wanted you could have cascade pick a single frame and use it for simulation. Textures like an array of smaller embers, rocks, leaves, etc can be set up on a smaller scale to get what you want. Like a 4 by 4 square or a 6 by 1. Load one texture and get a number of options, as long as each frame is different.
SubUV pick one frame instead of animate: For example if you'd set up 4 rocks on a 64 x 64 and you wanted each sprite to pic one of the frames you'd set up the SubImageIndex to Uniform Min 0 and max 3, and set up the required to horizontal 2 and vertical 2 with a setting to random. This would randomly pick one 32 pixel frame and display that.
I hope this helped and wasn't too confusing. Thanks and until next time have a good one!
I'm assuming you have an interest with Unreal and Maya otherwise you wouldn't be reading this, so you should have a basic understanding of Unreal Cascade and material system, Photoshop and Maya's rendering pipeline. What I'm not going over is how the Maya simulation was made step by step. I could have multiple posts just for that, so I'm going straight to the render, assembly, simple additive material, and the simple cascade set up. So that said, here we go.
The Experiment:
How do you take a simulation from Maya, and use it in Unreal's cascade as a SubUV.
Fire render Maya fluids from Fred Hooper on Vimeo.
Simulation in third party package: First you'll need to make the simulation of whatever you want the effect to do. (in this case a fire test made Maya's fluid dynamics)
Need: Second, determine how long of a simulation you need. A lot of this depends on your budget and what kind of visual fidelity you're going for. Games usually shoot for 30fps (frames per second) or above so if you want to have the simulation run for a second you should have at least 30 good frames (I'll render 36 or 64 depending on my budget). Eventually this will need to be made into a texture, so if you're using a 1024 x 1024 with 36 frames, each frame will be 179.67px x 179.67px and get me a second+ of animation. All of this comes down to your texture budget, and reuse. If I'm loading a 1024 simulation I need to be using it a lot. You'll need to experiment a lot on this, since it comes down to give and take with the look vs the need.
Render: Next render the simulation as frames into a folder. I usually use targa (.tga)s since they don't have visual degradation. Depending on how long of a simulation and how many frames you want you may want to over render the simulation frames to have a larger sample size. So for a 36 frame texture I'll render 72+ frames and use every other frame for more motion between frames.

Assembly: Now you need to assemble the texture. Take the frames and assemble it chronologically in Photoshop. Generally its better to assemble the frames then drop it down to a power of 2 size. If you have a large enough sample size, you can skip every other frame if you think it visually will make sense. The sample that we're using here is every other frame, since it didn't seem to degrade the quality of the animation. If you can make a java script or an action to make assembling the texture faster, then please do. Otherwise you're going to have to do it by hand, which is slow and makes iteration more difficult. We're lucky in this case since this sim doesn't need an alpha component otherwise you'd need to assemble it twice.
Save this as a Targa and make sure the image is set as a power of two. (in this case 1024 x 1024)
After the assembly is complete, we have something that looks like this.

Into Unreal
Now we have the texture we need. We'll need to import it into unreal and make a material for it. Load up Unreal and go to the content browser.
Import: Import the texture and make a .upk called FXPyro, with a group texture and name the texture T_FireSubUV. Remember to save your package after every step.

Add the Material: Next make a new material in the FXPyro.upk, Group Materials called M_FXAddSubUV. We're going to make this an additive material for the T_fireSuvUV

Additive Material: Next we're going to work on the additive material. The Material system in Unreal is really powerful and again this post would be huge if I went into all of the little things it can do. In this case, we're going to need for it to be additive, be usable on particles, be usable as a SubUV, and for my personal satisfaction have an edge blend so the sprite doesn't crash with the environment. In the SubUV Texture node hook the T_FireSubUV to it. Right Click in the FXPyro pkg and select new material and save it as group 'Materials' Name M_FXAddSubUV. String up the material like this:
 | |
| You can find most of these Material nodes by RCL in an empty space in the particles folder. Otherwise you'll need to find them on your own Larger Version |
 |
| Make sure the Material is set to Blend Additive with an unlit lighting model. If the usage isn't checked the Material won't be usable in Cascade. |
Add a Particle system (Cascade): Now we're at the point where we can make a particle system in Cascade. Create a new Particle system in the package FXPyro with the subgroup FXFire and name it FX_FireSubUVTest.

Cascade ed will come up and make a new particle system by RCL (right click) on the window and select new particle system. Here you will have the basics of the system, but you'll need to add a couple modules to the initial system to make it work.

Have the Particle use the Material: We need to make the particle system use the fire material (and therefore texture) we've been working on. In the FXPyro package single right click to highlight M_FXAddSubUV. Switch over to the open cascade window and go to the required module and highlight the materials field (left arrow) the material name in it. The path of M_FXAddSubUV should be in there and the sprite may vanish. Do not panic... the reason it could have vanished is we're using a vertex color in the material, and cascade doesn't have color values it can use to make a color. If its not there, add a color over life module and make sure its set to Constant 1, 1, 1 and the fire material will appear. As you can see the sprite looks a grid and won't be very usable.

Next change the following nodes so we can see what we're doing.
- Spawn Node: from default Spawn settings to Rate >Distribution > Constant 1
- Velocity Node: from Default Start Velocity Settings to Start Velocity/Distribution/Constant x 0, y 0, z 0.
 | |||
Larger Version |

SubUV Time: Now we have the material in Cascade, next we need to divide it into single frames. This takes a couple steps.
- First add a subImageIndex to the stack.
- Inside that node set the SubImageIndex to ConstantCurve and have the first input be 0 (beginning lifetime of the sprite) and 0 (the first frame) the second input have it set to 1 (end lifetime of the sprite) and 35(the last frame).

This set up will smoothly ransition between the frames if the following is set up correctly in required. In Required/subuv set the horizontal to 6 and the veritcal to 6. Now the simulation should spawn with the first frame.
 |
| PSUVM_Linear_Blend will allow the animation to play smoothly between frames. Larger Version |
To make it run through the animation change the Interpolation Method from none to PSUVIM_Linear_Blend and the simulation should start to run through the simulation, but it will snap between the beginning and end, since it hasn't been set up as a looping effect.
From here its a matter of tweaking the simulation to do what you want it to do in Cascade. This does not loop, to make it blend well you'd need to spawn multiple sprites and blend them in and out accordingly to make sure it doesn't snap... or import the render into aftereffects and make it loop before importing it into Unreal. For purposes of this example I changed the color over life to blend with a constant curve from 0 to 1 at the middle of the simulation and back to 0, with a spawn of 2.
Fire Test Unreal from Fred Hooper on Vimeo.
There are other uses for SubUVs rather than just running animations. If you wanted you could have cascade pick a single frame and use it for simulation. Textures like an array of smaller embers, rocks, leaves, etc can be set up on a smaller scale to get what you want. Like a 4 by 4 square or a 6 by 1. Load one texture and get a number of options, as long as each frame is different.
SubUV pick one frame instead of animate: For example if you'd set up 4 rocks on a 64 x 64 and you wanted each sprite to pic one of the frames you'd set up the SubImageIndex to Uniform Min 0 and max 3, and set up the required to horizontal 2 and vertical 2 with a setting to random. This would randomly pick one 32 pixel frame and display that.
I hope this helped and wasn't too confusing. Thanks and until next time have a good one!
Sunday, March 20, 2011
Homefront FX reel and a sneak peek!
Hello!
I know it has been a while, but I'm still working on the post for the pipeline from maya to unreal via subUV. I'm going to attempt to post that before the end of March. In the meantime, here's a quick cut reel I did from some of the VFX work I did on Homefront. Homefront uses Unreal tech so this is more of what Unreal can do. I came into the project late, and had a lot to do in a very short amount of time. I used most of the texture assets they had already made for consistency and because of the time crunch. The fire really needed work so I reworked that from the ground up... which is what I'll be showing as an example of the afore mentioned pipeline.Well here it is:
Homefront FX Reel 2011 from Fred Hooper on Vimeo.
Here's the other reel I worked up for Singularity:
Fred Hooper FX Reel 2010 from Fred Hooper on Vimeo.
The contact info is wrong on the Sing reel, but the Homefront contact info is correct: fhoop@rocketmail.com
And finally a sneak peak of the fire render I'm using for the next post:
Fire render Maya fluids from Fred Hooper on Vimeo.
Wednesday, February 2, 2011
Book Reviews: Elemetal Magic and Maya Studio Projects: Dynamics
My friends give me grief sometimes, since its a bit last year, but I love books. I have a tendency to troll around second hand stores, just looking for a gem here and there. Strangely, there aren't a lot of books on effects animation, at least not as much as modeling or coding. I've come across a couple books that have been introduced to me by other fx artists and friends as well as doing research into making better content for games. After this I'll be posting some process posts, and a bit o troubleshooting mainly in the Unreal engine.
Book Review: Elemental Magic: The Art of Special Effects Animation by Joseph Gilland.
 Elemental Magic: the Classical Art of Special Effects Animation on Amazon
Foundation book: This book is a must have for anyone wanting to do traditional or digital effects animation. The author Joseph Gilland has been working in traditional animation for years at Disney and other studios. I know. I know. This is a traditional animation book while what I do is digital. This book has a brief history of classic animated effects and the art of drawing SFX. It also breaks down the elements (chapters on liquids, Fire, smoke, explosions and magic) while keeping it easy to understand and each chapter builds on each other.
There are a couple different things I took away from this book. A lot of things that I thought I knew about elemental effects was either reinforced by this book or I was just not thinking and just plain wrong. Some of the general ideas of most elements being interrelated by force was a big one for me it made me look at what I was doing in games more carefully than what I needed. And finally the way its written is so easy to understand, there are a lot of hand drawn illustrations on what the author is describing, and it all seems to flow really well.
I'd suggest this to anyone who wants to wants to have a solid foundation of what kinds of forces drive elemental effects (and even some magical ones). Thanks to Tim Elek for showing me this book. Its been a great help making sure my effects make sense.
Book review: Maya Studio Projects: Dynamics by Todd Palmar

Maya Studio Projects Dynamics on Amazon
How To Book: After learing about fluid systems in Maya, I wanted to do more with the system that was a little more focused than what I was trying to do. Honestly I wanted to make some better fire... I didn't like the fire I was making, since it looked a little too smooth and not as crisp as I'd like, so I looked on line and found Maya Studio Projects: Dynamics on Amazon.
This breaks down all of Maya's dynamic systems starting with its particle system, then building on fluid systems into some physics. it then moved into smaller projects focusing on different dynamic systems in Maya. A basic to intermediate understanding of maya is useful for this book, since it goes straight to dynamics... which is what its for.
If you're looking to have a greater understanding of maya's dynamic systems in smaller chunks, then get this book. Its helped me get a greater understanding of maya's dynamics, and has allowed me to make some good custom, and generic content for games. This book is written to be used with Maya 2009 complete or Maya 2010.
Book Review: Elemental Magic: The Art of Special Effects Animation by Joseph Gilland.

Foundation book: This book is a must have for anyone wanting to do traditional or digital effects animation. The author Joseph Gilland has been working in traditional animation for years at Disney and other studios. I know. I know. This is a traditional animation book while what I do is digital. This book has a brief history of classic animated effects and the art of drawing SFX. It also breaks down the elements (chapters on liquids, Fire, smoke, explosions and magic) while keeping it easy to understand and each chapter builds on each other.
There are a couple different things I took away from this book. A lot of things that I thought I knew about elemental effects was either reinforced by this book or I was just not thinking and just plain wrong. Some of the general ideas of most elements being interrelated by force was a big one for me it made me look at what I was doing in games more carefully than what I needed. And finally the way its written is so easy to understand, there are a lot of hand drawn illustrations on what the author is describing, and it all seems to flow really well.
I'd suggest this to anyone who wants to wants to have a solid foundation of what kinds of forces drive elemental effects (and even some magical ones). Thanks to Tim Elek for showing me this book. Its been a great help making sure my effects make sense.
Book review: Maya Studio Projects: Dynamics by Todd Palmar

Maya Studio Projects Dynamics on Amazon
How To Book: After learing about fluid systems in Maya, I wanted to do more with the system that was a little more focused than what I was trying to do. Honestly I wanted to make some better fire... I didn't like the fire I was making, since it looked a little too smooth and not as crisp as I'd like, so I looked on line and found Maya Studio Projects: Dynamics on Amazon.
This breaks down all of Maya's dynamic systems starting with its particle system, then building on fluid systems into some physics. it then moved into smaller projects focusing on different dynamic systems in Maya. A basic to intermediate understanding of maya is useful for this book, since it goes straight to dynamics... which is what its for.
If you're looking to have a greater understanding of maya's dynamic systems in smaller chunks, then get this book. Its helped me get a greater understanding of maya's dynamics, and has allowed me to make some good custom, and generic content for games. This book is written to be used with Maya 2009 complete or Maya 2010.
Subscribe to:
Posts (Atom)